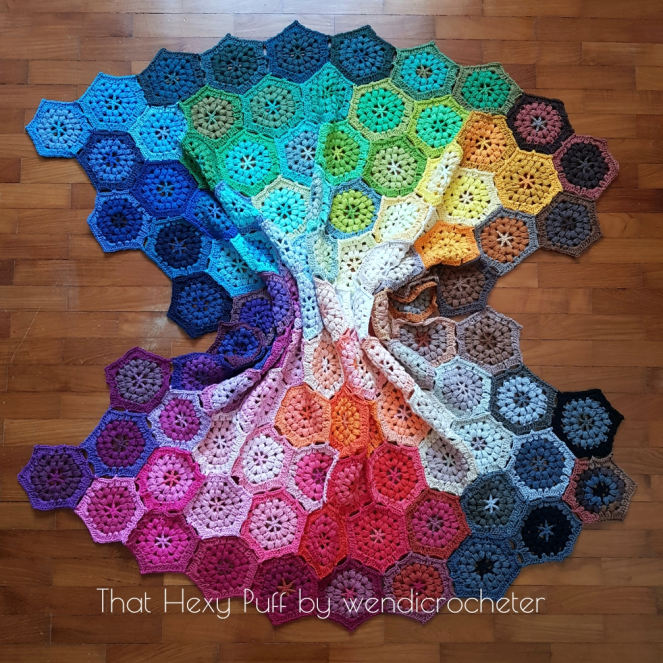
I spent almost the whole of 2018 creating a blanket using a box of the Scheepjes Catona Color Pack plus a stash of Catonas. I totally loved it and this year in 2019 I recreated another version using the Scheepjes Cahlista Color pack.
I’ve been very blessed to have the opportunity to create a project using the yarn sent by the lovely people from Scheepjes. Yeah to Scheepjes! Thank you so much!
The throw is written in US terms and is made up of 110 hexagons using the entire pack. There is 109 shades so the final motif is made up of an assorted range of dark hues. If you prefer a uniform look, get 1 more ball of yarn, preferably a dark shade. I used the remaining yarn to make a cushion cover of 2 sides with 2 different shades of a rainbow plus a heart stitched at the centers of both sides. So end of it, one box of the Scheepjes Cahlista Color Pack is entirely used up!
She’s my first hexagon pattern and I’m incredibly thrilled to share it with you.
Drop the mike… SHE IS DONE! Micro Mandala Madness in sewing thread at 14 inches / 35 cm across. Woohoo! Feeling a little sad that she is finished and also very amazed that I did something that I never thought would be possible! 🎉
I want to thank my husband for believing in me and believing that I can achieve whatever I set my mind to do. The kids love to talk to me when I’m counting stitches (argh lol) and he knows to distract them away from me till I’m done with a set of counting. He checks on my progress and often helps me in the little things and big things so I was able to spend the time working on MMM. 💓
I want to thank my two children. They are my biggest fans. They love everything I make. Adoration lasts from a few seconds to a few months depending on their mood lol. My colorways, inspirations and projects are mostly derived from them or with traces of their input. My family have been greatly involved in this project. They know mummy wants to make this very very much. 💗
If you have been following my progress you may notice I have been posting every part of her including a few wip videos. I started the project in June 2017. It has been an extraordinary 4 months for me to share her from start to finish. The response from like minded crafters have been amazing and I am so humbled and moved by the appreciation and interest. I thought no one would care. You have made my journey so much sweeter and have given me the courage and motivation too. So thank you for following my progress. 💞
I’m so excited to share her finished look. I even started a regular piece to compare how she tiny is. A regular dk weight Mandala Madness in part 2 would about the same size as her. For more photos check out the hashtag #micromandalamadness on Instagram.
I love the intense concentration work that the pattern provides and may work on micros again in the future. I skipped publishing the last two parts of the MMM due to fatigue and time loss. I wanted to clock one part a week from beginning to end and I managed to do that. (Except the week when I was travelling. But I published a pattern instead. So I was doing something even though I was away.)
I had been working on it anytime of the day to save time and to spend the time blocking to take a photo which would cost me a day or 2 of waiting. I really want to catch up so the photo takings would have to go. If you are on Instagram you would have caught glimpses of her in my Stories.
One of the common requests is about the colorway of this project. I didn’t have confirmation of the final colors as I was still contemplating to add blues and greens, thus I did not reveal that information yet. After adding the blues I did a poll on Instagram stories to come to the decision not to add the greens based on the followers’ decision. I was already at the last 5 rows at that point in time. I really want to keep a little something for myself so I won’t be stating the number codes but they would be easy to spot out if you’re determined. :p
The 0.4mm crochet hook is an Etimo Tulip. I got it from a craft building store called Okadaya in Shinjuku. You can find it online on Taobao (Unfortunately I can’t help with further navigation! :p ) and other online sites too.
Surprise! I am no crochet genius. I started with no aids and was finishing one part a week. The rounds got longer and harder so I found ways to keep up with finishing a part a week.
After row 66 which took me 4 days, I added magnifiers to speed up. You can get them in craft stores or online.
I also got a portable chargeable table light for cloudy and rainy days which hindered my crochet time. I chance upon it in a local store called Miniso.
Lastly, I only needed this for the last 10 rows. Band-aids! Get the cloth/fabric ones. The thread runs better and doesn’t affect the guage as much. Don’t use plastic bands or rubbery finger grips. They will mess up the guage and it will mess up the rounds. The blue threads was starting to cut my finger. I guess the combination of the larger rounds and my hunger to complete a row added on the strain. The last few rounds were really tough, mentally. I didn’t stop because I didn’t want to lose the momentum. I really really really want to finish this baby.
More to come?
Looking back I have absolutely no idea how I made it through the entire pattern. The most stressful and fearful part was actually the first 15 rounds. Even though I have just made Sophie’s Universe in a 0.5mm hook I was still fearful of going smaller.
For me, it is truly mind over matter. Once the fear is out the window, the rest was easier to cope. The uncertainty did creep in again when approaching part 10 where the diamonds are being formed. I even charted which row would take how many days, where do I stop for a break etc. But once past that I was back to my one row a day routine with the aids added in.
If you are inspired to try microcrocheting, I hope this post can help you in your journey. If you can dream it, you can make it! Make crazy things like me! Happy crafting!
Wendi xx
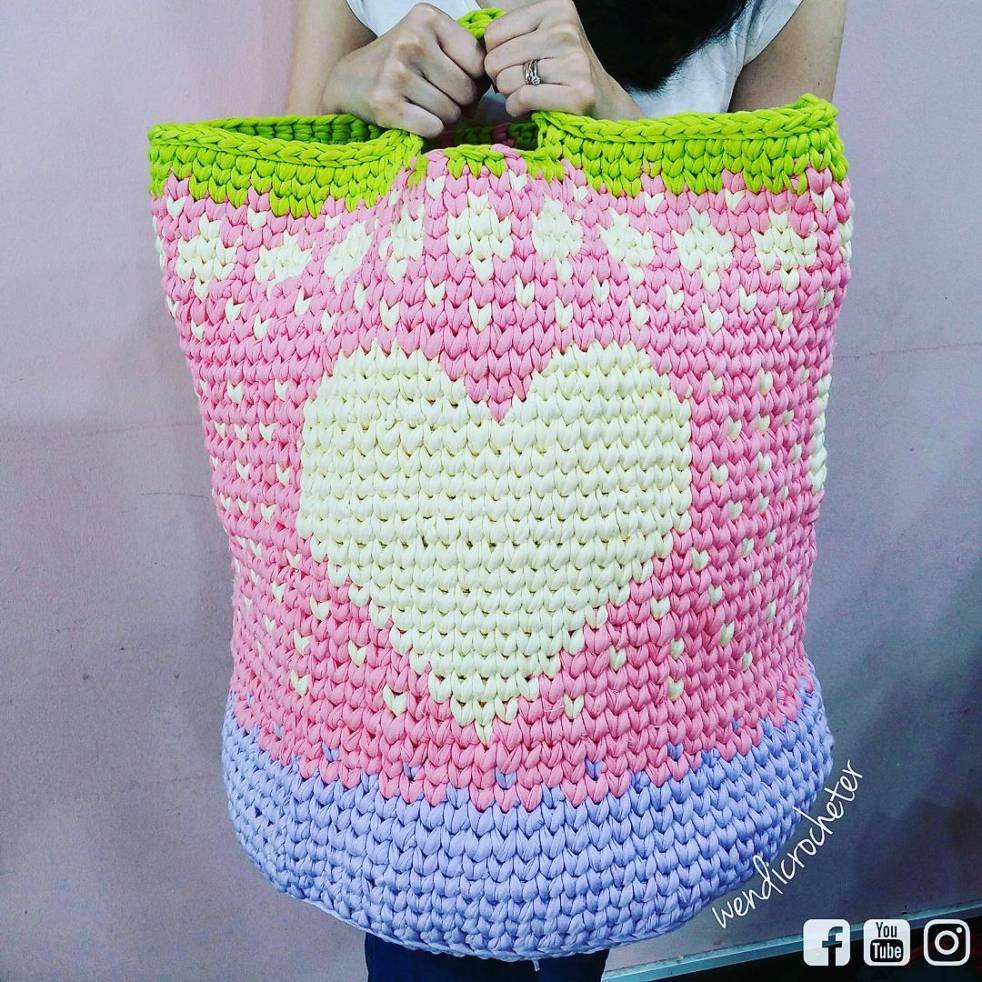
I made this giant at the spur of the moment when my daughter wanted a large basket. She gave me a list of what she wanted and I thought I’ll work something out. It’s made with a lot of love and I named my first pattern after her.
This pattern is adaptable to different sizes and can be applied into other kind of works like totes or pen holders etc. If you have a large stash of scrap yarn you can even make a colourful version!
I would like to thank my team of testers. It’s a huge learning curve and I am very thankful that they are willing to take the time to work along with me even though I’m a noob. Thank you Kaz Tung, Christina Loh, Audrea Ling, Ling Teo, and Kelvin Watt! (In case you are wondering why I have left and right of almost everything visual it’s because I’m a left handed crocheter! I realized I had to flip almost everything visual to make it easier to understand, hopefully to all levels.
This pattern works bottom up and predominately uses a stitch called the knit stitch. It looks knitted but it’s actually crochet. READ EVERYTHING BEFORE STARTING.
Skill level : MODERATELY SKILLED CROCHETER
What you need to know :
You’ll be learning a new stitch called the knit stitch. Crochet too tight or with an inappropriate hook size and you’ll be struggling to ‘stab’ your hook into the ‘V’ of the previous row stitch. See my videos below to see how I crochet the knit stitch, there should be a comfortable amount of space inserting the hook into the ‘V’ space. One of my dear testers ended up with a blister and broken crochet hook! :p
You’ll be working with 2 or maybe 4 or more strands of different coloured yarn. Decide how you want to work the strands else you may have a tangling mess of yarn.
You’ll need to know how to interpret a graph as it is customisable and not drawn to scale. ( First square at the bottom corner is not the first stitch!) The essential parts like the main images and spacing is minimally drawn but sufficient to work out the rest.
You need to use the graph AND written instructions as they go together on where to crochet the little hearts or to do a colour change.
You’ll need to try to maintain a consistent tension else you’ll have a wobbly piece of container. The texture of the basket should be a little stiff and be able to hold its own shape.
You’ll need to plan the graph and handle placement prior to start, as the graph consists of three big hearts. Ideally, you should have one handle above the first big heart while the other handle is between the next second and third big hearts. As the entire pattern is customisable, the handle placement count may be different so PREPLAN the placements if you want it to look perfect!
You’ll need :
(T shirt yarn. I used about 3.5kg worth. That was 14 balls x 250g for me)
5 balls x 250g of purple t shirt yarn (Colour A)
5 balls x 250g of pink t shirt yarn (Colour B)
3 balls x 250g of cream t shirt yarn (Colour C)
1 ball x 250g of green t shirt yarn (Colour D)
10mm crochet hook or any hook size that matches the yarn weight of your choice.
Gauge is not crucial.
Terms used.
mc – Magic Circle
SC – Single Crochet
ss – Slip Stitch
inc- increase
KS – Knit Stitch (Insert hook into the ‘V’ of the previous row stitch, yarn over, pull up a loop. Yarn over, pull through 2 loops on the hook.) Short clips below to illustrate this.
st – stitch
sts – stitches
BLSC – Back Loop Single Crochet
Note to remember.
Always slip stitch to the first stitch to end a round and chain 1. Chain 1 does not count as a stitch.
The Base
Row 1 – To start, using A, mc, 6 SC into the loop. ss into the first SC, chain 1. (6 sts)
(Alternatively, you can do a slip knot, chain 2, SC into the first chain 6 times.)
*With t shirt yarn being used, my best start for a flat base was 6 stitches. Anything else became a wobbly mess. DO NOT USE SC after this part to do a regular flat round increase if you want a FIRM base. The starting 6sc works on most yarn weights. My heart graph was written for a 84 sts round so you may have to modify a bit if your stitch number is different due to different starting stitch or different final row base count.
Increase to form the base (A normal increase method would result in a irregular circle. I wanted a really circular, roundish base so the increases are done in the order below. As long as you are doing the increase away from the previous row’s increase that works too. If you are new to the knit stitch, you may struggle to ‘stab’ your hook into the ‘V’ as you work the round. Switch the hook size or crochet looser or watch the tension. You may have to work on the stitch a few more rounds to find your ‘groove’. )
(Refer to my video on Instagram or Youtube. Same as below, on how to do Knit Stitch)
Row 2 – (2 KS into the first st)*, repeat * 5 times till end. (12 sts)
Row 3 – (KS into first st. 2 KS into the next st.)*, repeat * 5 times till end. (18 sts)
Row 4 – (2 KS into the first st, KS into the next 2 sts)*, repeat * 5 times till end. (24 sts)
Notice the increase is not done on the previous row’s increase? You will space the increase evenly throughout each row away from/middle of the previous row’s increase. This will create a very round circle instead of a round with 6 obvious points.
Row 5 – (KS into first 3 sts, 2 KS into the next st)*, repeat * 5 times till end. (30 sts)
Row 6 – (2 KS into the first st, KS into the next 4 sts)*, repeat * 5 times till end. (36 sts)
Row 7 – (KS into first 5 sts, 2 KS into the next st)* , repeat * 5 times till end. (42 sts)
Row 8 – (2 KS into the first st, KS into the next 6 sts)*, repeat * 5 times till end. (48 sts)
Row 9 – (KS into first 7 sts, 2 KS into the next st)* , repeat * 5 times till end. (54 sts)
Row 10 – (2 KS into the first st, KS into the next 8 sts)*, repeat * 5 times till end. (60 sts)
Row 11 – (KS into first 9 sts, 2 KS into the next st)* , repeat * 5 times till end. (66 sts)
Row 12 – (2 KS into the first st, KS into the next 10 sts)*, repeat * 5 times till end. (72 sts)
Row 13 – (KS into first 11 sts, 2 KS into the next st)* , repeat * 5 times till end. (78 sts)
Row 14 – (2 KS into the first st, KS into the next 12 sts)*, repeat * 5 times till end. (84 sts)
(15 inches / 38 cm across)
I stopped at row 14 but you can add or reduce rows at your preference. If you want to create a repetitive graphic pattern like mine, make sure the final stitch count is in multiples of 4. (The spacing of the little hearts is most eye appealing to me.) Or can be divided into the number that works with the design you have in mind)
Now you should have a flat round base! 🙂 Once you’re very sure about the size of the base you can weave the end in. With t shirt yarn, I’ll use a smaller hook to help or using just fingers to push it round the loops works too.
The Body
Now the base is done, you will be working upwards to create the height of the container. It will be 84 sts on each row all the way till end. If your number changed it means you’ve missed or added a stitch somewhere. The ‘back’ of the base will now be facing the top as you work. I did not add a 2nd yarn till Row 8 but if you want a firm texture throughout, add the 2nd yarn and work over it from now onwards or if you want to jump to row 8 and form the little hearts it’ll work too. Consistent tension is crucial if you don’t want a wobbly basket. HOLD and try not to pull the unworked yarn too much as you crochet.
Row 1 – BLSC into the same st, BLSC around.
Row 2 to 7 – KS all the way around, slip stitch with colour B, chain 1. (You can refer to the graph from Row 2 onwards, and repeat the graph from midpoint to end to form 3 big hearts in a round)
Now, there will be 2 rows of small purple hearts in alternating order with a lot of pink. Crochet over the unworked yarn, hold and try not to pull too much to avoid a wobbly shaped basket.
Row 8 – (Using color B, 3 KS into 3 sts. KS into the next st, pick up colour A, yarn over with colour B to finish the st)*, repeat * till end.
Row 9 – Using colour B, KS into 1 st, (KS into the next st, pick up colour A, yarn over with colour B to finish the st, KS into the next 3 sts)*, repeat * to end with KS into the last 2 sts.
(cut color A and fasten off)
Row 10 – KS with color B around to end.
Note* (The graph is not drawn to scale! 1st square on the corner is not the 1st stitch as mentioned) Depending on where you place the big hearts, use the graph below to design the basket. A solo single square would be the little hearts. If you need help on color changing yarn on the big heart, at the last step of working a stitch use the color that should be in the next square to pull through the 2 loops. There’s many examples on Youtube if you still need a visual guide.
You’ll reach Row 35 , Row 36 would be color D, green. (Height : 18.5 inches / 47 cm)
Note : 3 big hearts should be formed away from the start and end of a row.
The handle
The next 2 rows is the formula of the handle. Don’t work it literally till you checked the big hearts placement. Most ideal positioning is to place one handle right on top of the big heart and the other handle between the other 2 big hearts. You should have 32 ks sts, 10 chains and skipped sts, 32 ks sts, 10 chains and skipped sts to make the handles. If you’re making a larger/smaller piece or using your own graph, your first st and last st may be anywhere between the formula sts. If you are new to crocheting, don’t fret, calculate and find that perfect placement for your work.
Row 38 – Work 16 KS, 10 SC over chain, 32 KS, 10 SC over chain, 16 KS.
You can repeat Row 38 if you find the handle too thin.
Row 39 – SS across the front of the sts all the way around. ( I didn’t want to cut the yarn so this is what I did. Lift the hook and reinsert from the front to back, pull the yarn to the front to start) This edging helps to stiffen the handle, you can use a different material like a ribbon to loop around it or decorate it with pompoms too.
Finished! Weave all the ends in. Now you have a cute basket of hearts! 🙂
This pattern is completely adjustable, I don’t anticipate many would make the same 3.5kg giant basket like me that’s why I rewrote to a free size pattern. Have fun coming up with your uniquely sized basket!
Work by my dear friend, tester Kaz Tung. She’s a crochet magician, she makes everything look gorgeous! (This was before the handle part was finalised. I have since rewritten the handle formula so you can align the big hearts on or between the handles.) Kaz made a tote using the same pattern which is definitely more workable and less intimidating than my crochet giant lol. She used double strand Stylecraft Special DK and 7mm hook. Colours in Duck Egg, Clematis, Stone and White.
First and foremost I have to say I’m more of a picture sharer. I don’t really have much to say! Thus the blog has been quiet. But I wanted a blog so I can call myself a blogger so here we are lol. I felt this post is necessary as I don’t really like to leave questions unanswered but at the same time I can’t answer the questions one by one each time I make an update regarding my works. So today I’ll be answering almost all the questions (especially the common ones) that I can remember and think of. I may also do a short summary post (Not sure when! lol) on tips regarding micro crocheting. I don’t like to read lengthy posts but I know this is a lenghty one. Oops!
I am amazed my photos have inspired so many to try micro crocheting blanket patterns like the Mandala Madness by Helen Shrimpton and Sophie’s Universe by Dedri Uys. I’m guessing it’s because I am an amateur and am relatable? So if a person like me with 2 years of crocheting can achieve this, with a right amount of factors combined, I believe you can do what I did too! Even though I was not the first crocheter to attempt making micros, I am still very flattered and humbled and encouraged by the attention and interest shown by crafters around me.
So here comes the interview.
To myself, from myself lol.
Q : How did you get into micro crocheting?
A : The idea to micro crochet came to mind in the early January 2017 when I was doing a mini spring clean of my crafting stash and found a old box of DMC embroidery floss. At that time I was working on a rose granny square lap blanket with fingering weight yarn with a 2mm hook (It was my thinnest hook attempt yet.)
This was the rose granny square lap blanket that I was working on…
I was thinking I can use those cross stitch threads so I tried to crochet with the loose strands. I started with 6 strands, then I tried 3 strands. Then I remembered I have a 0.75mm hook. Took out that hook, sorted out one strand and worked the same rose granny square pattern.
This was the first micro try out… And that was when I fell in love. I thought to myself, “I want to make a micro Sophie.” I know I can’t dive into it right away so I shall work on other things and make my way towards her.
I do remember seeing Geneva-Kae Snyder’s unbelievable Micro Sophie over a year back. I was still learning and making awfullooking amigurumis and small items like bags and beginner projects in regular yarn and was thinking there is NO WAY that I can do something so exquisite and intricate. It is not humanly possible! (Look at me now. So never say never ok?!) Hers was a perfect 10 inch square. Mine came out to be 14 inches a square when stretched.
Q : How long did it take you to train yourself to work with tiny hooks? What did you do? What do I need to have to try micro crocheting?
A : It isn’t a first try success story for me. I know I needed a few things ready first. Mostly mental preparation work.
You will need :
-confidence,
-stamina,
-patience ( A LOT OF IT )
and lastly the most important, something that will take you through ANYTHING that you want to achieve in life, a whole lot of GRIT.
And yes, you have to really really WANT it. And once you get rid of that fear (mind over matter), half the battle is won.
I strongly encourage others to SLOWLY work their way towards it and don’t give up. Unless you have a strong will I don’t recommend jumping right into something that is not near your comfort zone else it may put you off instead which I am seeing it happening to some who have spoken to me.
Someone said to me that she has no issues working with tiny hooks but she wished someone could do the first few rows for her. So from there I can sense at least one element is missing already. So you have to realize there is no shortcut available too.
At least you are luckier than me. I had no one to ask when I attempted this jouney. I walked alone, but sharing it on social media has made me realized I’m not really alone in this walk after all. What amazed me is that people feel inspired to try micro crocheting and have been cheering me on. That made me happy and motivated to carry on. ( I know I will complete my works but knowing there are people who care made the journey sweeter.)
I remember one sweet lady she said: “Oh please finish it soon! I’m in my 70s. Future uncertain lol.” That cracked me up.
So after I finished that rose blanket, I decided it was time to go smaller and picked to work on the Mandala Madness in lace yarn in 1mm hook.
The first part was not very uncomfortable. From using a 2mm to a 1mm hook, the transition was a breeze which surprised me.
The initial fear was there but the more I crochet, the more comfortable I got. (Totally mind over matter, trust me it will get easier the more you work on it.) More photos on my Instagram and under the hashtags #microsophiesuniverse and #micromandalamadness. If you are on Instagram and are working these, please use the hashtags! I’ll love to see them and I am sure many other micro enthusiasts would love to see too!
The only hard part for me to manage was the curling. I like how the stitches look so I chose that over increasing the hook size a few more times. I increased my hook size once only.
This was one of the later photo of Sophie after washing and blocking. It’s not obvious but the ‘puff’ in the center has flatten down a lot. I hope to frame my micro works plus Sophie hopefully by the end of the year.
Q : How can you even see the stitches?! Do you use a magnifier? How often do you work on your micros?
A : I was doing a bit each day with Sophie. The thread was thicker (Gutermann Sulky Cotton 12) so I was still able to see what I doing. I only work on it during the day with good sunlight. Once I got greedy and decided to do 3 rounds (that was midway) and it took an entire day. I regret it and went back to finishing just a round a day (an hour or 2 on average) or at least till a corner. After the squaring and the butterfly band the rest were easy and I was able to do a few rounds a day because I was already very used to the momentum.
Here’s my favourite part, the roses. Isn’t it pretty? Matches my nail color too hah!
With the micro Mandala Madness (Currently she is not finished yet), the thread is thinner (Gutermann Sulky Cotton 30). The pattern, being bigger than Sophie, I anticipate it would take a longer time to complete. I was doing the same, good sunlight, one row a day. If it was taking me too much time, then at least up till the end of one repeat. There was no curling problem other than managing my own tension. (I am at Part 13 when I made this post) With 24 rows left I seem to be on the right track timeframe wise. I start to not work on it daily.
I was doing about one row a day till part 10. Row 66 took me 4 days. I don’t want to miss my own deadline (I hope to frame her by Christmas) so I started to use magnifiers after finishing that part.
A : I am using Tulip hooks. I have ordered from China’s Taobao (the 0.5mm onwards). The 0.4mm by Etimo Tulip I got from Okadaya in Shinjuku, Tokyo. https://www.timeout.com/tokyo/shopping/okadaya
I’ve recently acquired a 0.35mm from Taobao too. I don’t have any plans for that hook yet.
I looked around and notice most micro amigurumi artists use Gutermann so I bought the same brand but picked my own thread types. My focus wasn’t really on making the smallest so I did not pick the thinnest threads. I picked the range with the prettiest colors to me and that I felt the thickness would match the hook sizes that I have. In case you haven’t noticed, my works are usually color focused. So if you are color focused like me, I would suggest that you pick colors that you like first, then pick the thread type.
Q : Why? What’s the point? Are you mad?
A : Would you ask a painter why he paints? If you have to ask, I think you won’t understand even if I answered. There is no reason for art.
So that’s the end of my lengthy post. If you have read all the way to the end, thank you!


You must be logged in to post a comment.